Tuesday, September 28, 2010

Swing coat by Dear My Kids Easywear

This is the little jacket I made for the Sew-a-Long put on by From an Igloo.
I think it turned out pretty cute. The pattern is by Dear My Kids Easy Wear.
I also purchased 2 other patterns, and am looking forward to giving them a try!
The jacket is a light weight fine cord with a cotton lining.
It does run a big small under the arms, so we might not be keeping this one. But it sure is cute. And Princess A was such a fun little model with her matching phone and leather beaded bracelet (see last post for bracelet).

Front view with sneak peak of lining


Close up of collar and buttons at yoke.


Back view - cute little box pleat.

Side view

Monday, September 27, 2010

Knotted Leather Bracelet

Two more bracelets made from knotted leather and beads.
Again inspired by the bracelets in Garnet Hill - but from an older catalog.
Guess I'm just behind the times.
 
They consist of 3 strands of leather (or 2 leather and one wire) and then the beads. A simple macramé knot done 2-3 times in-between each bead that is threaded on in the middle. I'll try to work on a tutorial for this soon - when I've got some spare time. HA!


Tuesday, September 21, 2010


Who could live in this nice little castle?
Someone who has a vanity mirror and space to store fun things.


A Princess?
A ballerina
Someone with a lot of dress up clothes!
Dresses, skirts, even a mermaid!

This little girl lives there. She's a simple little girl who loves to dress up and have fun. Much like my own Princess A.

 
I originally got this idea from the Butterick website on their free download page. They make a fabric "paper" doll with Velcro tabs. Too much fuss for me, felt seemed to be easier and would stick to itself.
So I got to work, made the doll, and then started on some of the clothes. The pink/blue princes dress is reversible as is the ballerina outfit. They got to be a bit heavy, so I went to just one outfit on one side. I then needed a place for her to "live" and made a castle with pockets for some of the smaller pieces like bows and shoes. Next was the mermaid outfit, swimsuit and lace skirt. I could go on making more and more outfits for her...but I'm afraid her castle is already a bit snug - and I'm not sure how to add on an addition.
Princess A loves her felt doll and dressing her up. She comes back to it over and over and loves the fact that mommy made it for her. Could she melt my heart anymore?

Sew Along - Kids jacket

So excited to start the sew-along that From an Igloo is having!


Check back later today to see how far I've get...

Saturday, September 18, 2010

Mini Bride Dress - and such a beautiful bride!

My beautiful SIL was married this past July and asked Princess A to be a mini bide in the wedding. My SIL’s dress is beautiful, and we wanted something that would resemble her dress. So off to the drawing board. I had an idea of the type of dress I wanted to make. It needed to match, be semi fitted, comfortable and something Princess A would want to wear all day.  How to do all of this? Shirring! I cut the front by copying the front of another dress that fits well. Then made the back, shirred it…then the skirt. The triple layer at the bottom matches the bride, and the halter top is actually one of the straps from the bride’s dress. I added lace and hand sewed on all the beads. It took forever, but I think it was totally worth it. There is also a matching train that snaps on. I’ll have to find some photos of that and add them in when I find them. The dress fit Princess A to a T, and she wore it until she fell asleep on the dance floor. It was quite a night!

Princess A and Christi

front of dress

bodice

beading at the bodice

bottom hemline of dress

back of dress

Sunday, September 12, 2010

Tooth Pillow

Little Man C had a loose tooth quite early - only a 2 months after he turned 5. It was actually quite unexpected. We had been in to the dentist that morning and our hygienist said it was lose and would probably fall out in the next day or so. I was shocked, really - a lose tooth already??!! Well he wiggled and wiggled on it, had it bent all the way forward and asked me how to get it out. I told him to grab it with two fingers and pull....AND HE DID! Out it popped. Now what to do with this tooth? We needed a special place for it under his pillow. So I went out and found a cute pillow pattern by Jill Tacy (can't find it on the web again, so sorry no link.)

I had plenty of scrap fabric around to throw one together quick. It was easy, turned out cute and Little Man C loves it! He's a smiling tooth on one side with a little pocket on the back perfect for a tooth.


Cheeks are pink felt appliquéd on, the eyes and smile are stitched with embroidery thread.


Saturday, September 11, 2010

When I saw the Princess Bella dress at Izzy and Ivy, I knew I had to have it. I just loved the layering and all the fabric involved. Shirring, layers, bows - can you get any more girlie? Plus the pattern is size 2-10. We are talking a lot of wear out of this one. Dress, shirt - maybe even a dress that becomes a shirt. So I bought the pattern, found some cute valentines fabric and set out to make the dress for Princess A to wear to the Disney Princesses on Ice this past Valentine's Day.

The pattern, or I should say directions, are quite easy to follow. This pattern is more or less the directions/measurements on how to cut out all your pieces - rectangles and such - versus a pattern you pin on and trace. I actually marked out the pieces I needed on some large paper first, just because I like to cut out from a pattern piece rather than try and measure fabric.

This was my first attempt at shirring. And I now love shirring. All in all the dress went together really fast. The pattern was even easy enough that I was able to make a mini version for her Bitty Baby Doll - Bee. Princess A was an adorable little doll at the Disney Ice show.

Since February she's worn it a few other times, including this summer as just a sun dress. It has LOTS of room to grow so I think it will fit her for quite a few years (again why I love shirring).


Friday, September 10, 2010

Argentian Rhodonite Wrap Bracelet

I first saw the very cool wrap bracelets over at Garnet Hill. I cut the page out and figured out someday I'd figure out how to make my own.

Then I came across this tutorial over on the Ruby Mines Blog. Now I had to try it.

I didn't have enough turquoise beads on hand, but did have these lovely pink Argentian Rhodonite beads on hand in 3 different sizes. My inspiration picture from the Garnet Hill magazine has the different sizes in it.

So I gave it a shot. Robin's tutorial is super easy to follow.
I only made 3 wraps around and found that to be plenty with the thickness of the leather and beads I chose.
I plan on making another one with turquoise once I buy some more beads....


Picture compliments of Little Man C. (any opportunity to use Mom's big camera, LOL)

So go out, grab some beads and try it!

Thursday, September 9, 2010

Call Me - T-shirt upcycled into a super cute dress!

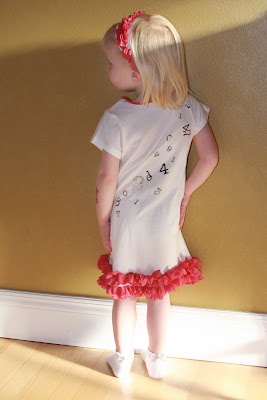
I saw this t-shirt at Wal-Mart on the 1.00 rack and just had to have it (seriously, a buck?). However, it was their Miley Cyrus brand and runs very small and is quite thin. But I loved the phone booth…what to do? Make it into a dress for Princess A! I found some faded looking red fabric for 1.95 a yard at the fabric store that matched perfect and picked up a yard.

The first thing I did was take off the sleeves using a seam riper so I could re-use them. I had no idea what I was doing and just winged it. After I had the sleeves off I grabbed a jumper that fits Princess A very well. I laid it on top of the T and cut along the same lines. I then measured about how big the sleeves needed to be and put them back on, sewed up the sides and the basic dress was done.

Then it was on to the ruffles. I made two very long and full rows of ruffles, sewed them on in the middle so it would be floppy on both the top and bottom. I also cut a thin strip to add around the neck.

The headband is actually the bottom of the t-shirt with more ruffles sewed on top.

I made her matching leggings, but didn’t have them done when we did this photo shoot.

It’s a super comfy dress – that cost me less than 3 bucks! Can’t beat that!

We started with this:


And ended up with this:

Don't you love that model pose?

Wednesday, September 8, 2010

Minnie Mouse Inspired Dress

This December we will be visiting Disney. It will be Princess A's first trip to Disney and she is SO excited! I want her to have some special outfits to wear and thought that a Minnie Mouse inspired dress would be perfect.
I started with an idea from a pattern I had on hand, and then drafted my own version. The top has a semi fitted front, and the back is shirred for a nice tight, yet flexible fit. (LOVE SHIRRING!)
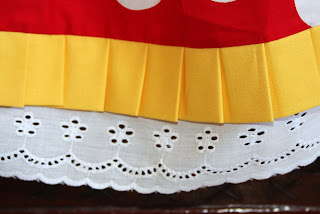
Halter tie, large tie at the waist. The bottom has 1" pleats all the way around with eyelet peaking out underneath.
To top it off I had to make matching bows for her hair. She wasn't sure about wearing a Minnie Mouse dress (she's a bit obsessed with Princess Aurora), but after having it on she thought she was pretty darn cute. All in all - a hit!

Tuesday, September 7, 2010

Disney Princess Dress - Pre-shirred fabric.

This dress is made from a pre-shirred remnant that I picked up one day. I think it turned out pretty good, and A loves it. It will be perfect for a trip to Disney. Either as a sun dress, or with a little top underneath if it's cool.
I simply cut it to the correct width, and sewed a seam down the center back making a tube. Then cut off some of the bottom of the little extra piece left over to make the straps and the bows. I still had some left - just enough for a headband. I then used the left over shirred part in the back of the headband so it's stretchy.


A loves it! She hasn't wanted to take it off. With a pair of pink dress up heels, she's ready to go and hit the town!